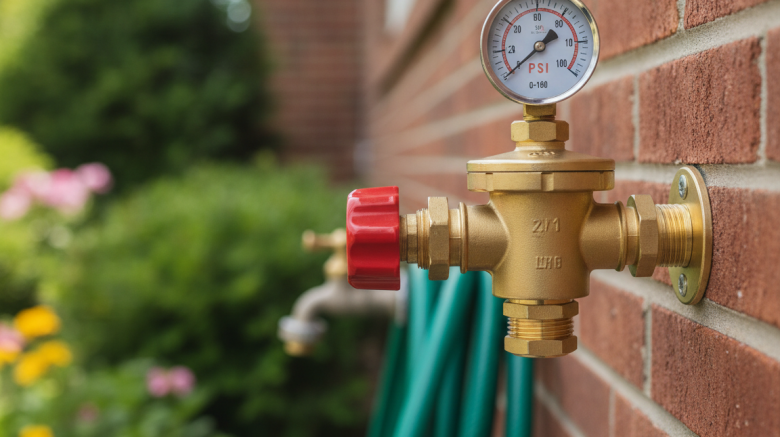
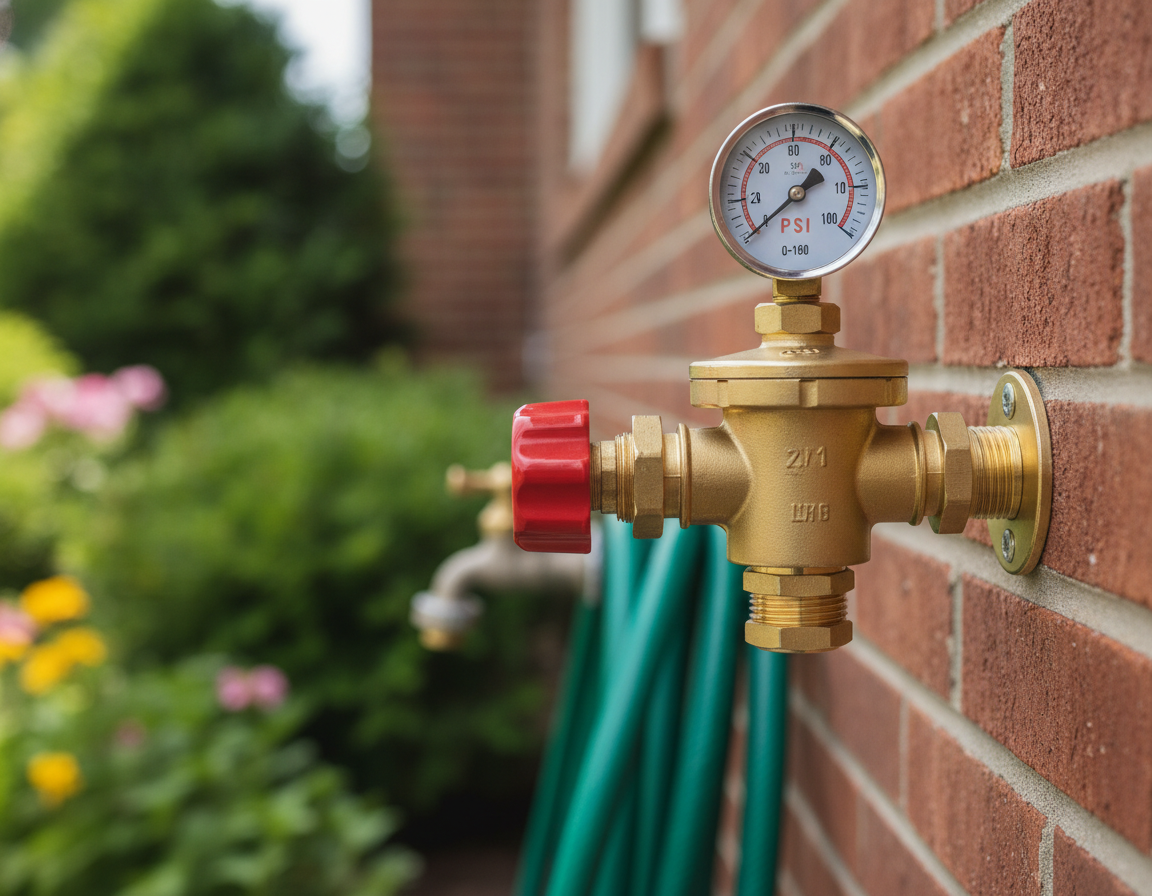
A water regulator valve is used to stabilize water pressure at a reliable level for your home and garden. It shields your plumbing, improves appliance life, and cuts down on wasted water. Most home systems are aimed around 40–60 psi, while many units arrive pre-set at about 45–55 psi. When inlet pressure from a municipal supply reaches 40–90 psi, a Main Water Pressure Regulator may be required to satisfy code limits and defend plumbing components.
Pressure Water Regulator
Install a Pressure Regulator For House where the main line feeds into the building, typically after the main shutoff and often with a check valve and filter. Most House Water Pressure Regulator units feature an integrated strainer and gauge for simple testing. Adjustment is manageable: shut off supply, relieve pressure, loosen the locknut, turn the adjustment knob to set the desired psi, restore supply, and verify with a gauge.
For drip irrigation and garden watering, a Water Pressure Regulator stabilizes inlet pressure so emitters, tubing, and fittings are less likely to blow out. For bigger layouts, verify minimum flow specs and consider a pressure limit valve for constant outlet pressure. If the regulator fails to adjust or maintain steady pressure, it is time for repair.
Core Takeaways
- A Pressure Water Regulator safeguards pipes, fixtures, and appliances by keeping pressure in the 40–60 psi range.
- The Main Water Pressure Regulator should usually be installed after the main shutoff, filter, and check valve.
- Most regulators are factory preset near 45–55 psi and may include a gauge and integrated strainer for simple checks.
- Garden systems work best when regulator GPM capacity matches demand, especially when a pressure limit valve is used for multi-zone layouts.
- Routine checks include relieving pressure, adjusting the knob, testing with a gauge, tightening the locknut, and inspecting for leaks.
Understanding Pressure Water Regulator: What They Are And Why Your Home May Need One
A Pressure Water Regulator is a straightforward device that keeps incoming water pressure at a safe level for a home. You may also see it called a PRV, a pressure regulator valve, or a Water Regulator Valve. Manufacturers such as Watts and Honeywell, along with many plumbers, often use these names in specifications, manuals, and installation instructions.
A standard Pressure Regulator Valve usually contains a diaphragm, spring, seat, and t-stem. Incoming water pressure moves the diaphragm, and the spring resists the pressure. As flow demand or inlet pressure changes, the t-stem modifies the seat opening to help keep outlet pressure stable.
For many homes, fixture pressure is ideally kept in the 40–60 psi range. Codes such as the International Plumbing Code set upper limits near 80 psi to protect piping and appliances. A Water Pressure Reducing Valve is often required when municipal supply pressure exceeds local code limits or when frequent meter-side spikes appear.
A Water Pressure Regulator can lower strain on copper pipe, PVC lines, valves, and fixtures. By keeping pressure more stable, it can reduce leak-related water waste and slow wear on appliances such as water heaters, dishwashers, and washing machines. Irrigation zones and drip systems also benefit when the regulator matches outlet pressure to component needs.
Water regulators are available in factory-preset and adjustable designs. Most models specify lowest required flow, maximum flow, and the operating range needed for proper regulation. In garden systems, outlet pressure should match the components, because drip emitters and micro-sprays usually need far lower pressure than rotors, sprinklers, or foggers. Clean or adjust a regulator when performance falters; replace it if it cannot hold a stable setting.
Where To Place And How To Size A House Pressure Regulator And Garden Systems
Selecting the best regulator requires attention to installation location and system flow demand. A Main Water Pressure Regulator is normally fitted at the point where the service line enters the home. Depending on the property, that location may be a utility room. A common layout uses a main shutoff, then a check valve and filter, followed by the pressure-regulating device. Installing it after the filter helps keep debris away and may extend the device’s life.
Pressure Regulators may be installed near the main shutoff, close to the water meter, or ahead of irrigation timers and controllers. In irrigation layouts, the regulator is usually best placed after filtration and before control valves, timers, or zone devices. That placement supports consistent pressure at drip emitters and micro-irrigation parts. Where space is limited, use an accessible spot so future testing, adjustment, and gauge connection remain easy.
Sizing should be based on system GPM, not only on pipe size. For irrigation, total the emitter output in GPH, then convert that figure to GPM for regulator selection. Whole-house installations require enough GPM to handle showers that may operate together. If the regulator’s minimum flow exceeds the system flow, it may fail to regulate effectively and pressure can climb.
Before buying, review each unit’s stated flow range. Smaller regulators may cover 0.5–7 GPM, mid-range options may support 5–18 GPM, and heavy-duty units may reach about 70 GPM for larger properties. Choose a Pressure Regulator For House that matches peak demand and meets local inlet pressure limits.
Your zone design should determine whether a standard pressure regulator valve or a Pressure Limit Valve is the better option. A pressure limit valve is useful where flow may stop, since it maintains outlet pressure near the chosen set point. Standard regulators generally suit downstream positions near zones, fixtures, or branches where minimum flow is modest.
Correct thread type and connection size are critical for a neat, leak-resistant installation. Typical connection options include 3/4″ hose-thread, 3/4″ pipe, 1″, 1-1/4″, 1-1/2″, and 2″ pipe-thread sizes. Many regulators include a gauge port or hose-thread boss so pressure checks are convenient. Look for integrated strainers, built-in filters, and brass bodies to reduce clogging and corrosion.
As you compare models, check certifications and local code requirements. A Main Water Pressure Regulator rated for local inlet pressures protects plumbing and appliances. Units with a visible gauge and removable strainer make routine maintenance, pressure checks, and quick troubleshooting simpler.
Setup, Tuning, And Care Tips For Optimal Performance
To keep a system efficient, start with careful planning and continue with routine maintenance. A good installation starts with a practical plan and quality parts from trusted suppliers. The following guidance covers key steps for setup, fine-tuning, and ongoing maintenance. These practices help maintain consistent Water Regulator Pressure and long-term reliability.
Before-Installation Checklist And Suggested Location
Position the device after the main shut-off and any coarse filters. Standard Water Regulator Valves should usually sit before downstream timers, zone valves, or control devices. Before fitting it, confirm that the unit meets the minimum flow requirement for the system. Look for a built-in gauge, strainer, or test port before installation begins. If those features are missing, add a separate gauge or port from Installation Parts Supply.
Step-By-Step Installation Overview
Start by turning off the main supply, then open a faucet to release pressure. Make sure the regulator is oriented correctly according to the manufacturer’s flow arrow. Choose the right thread adapters, couplings, or fittings for the connections. Use thread tape or sealant only as directed, then tighten fittings to the recommended torque or snugness.
Restore supply gradually and check each connection for leaks. Open several fixtures and confirm that Water Regulator Pressure remains consistent. When the regulator lacks a built-in gauge, connect a hose-bib gauge to a test point so the pressure can be verified.
How To Adjust A Water Pressure Regulator Correctly
Before making adjustments, always bleed off system pressure. Loosen the locknut, then rotate the adjustment stem or knob in careful increments. To increase pressure, turn clockwise; to decrease it, turn counterclockwise. Use a reliable gauge while adjusting and test multiple outlets to confirm the setting is stable.
After the target pressure is achieved, secure the locknut and recheck the fittings for leaks. If readings swing or the regulator cannot hold its setting, stop making further adjustments. Consult a licensed plumber or consider replacement parts from Installation Parts Supply.
Regular Care And Lifespan Expectations
Check the regulator on a regular basis for seepage, corrosion, vibration, and loose fittings. Perform a pressure check at a hose bib with a gauge and compare readings over several days if fluctuation is noticed. Follow the manufacturer’s instructions to flush integrated strainers or screens.
Many regulators last roughly 10–15 years under normal conditions. Replace any unit showing persistent corrosion, erratic pressure, or mechanical failure. Having spare gauges, seals, and fittings from Installation Parts Supply on hand can make repairs less disruptive and reduce downtime.
Common Problems, Diagnosis, And When To Get Professional Help
When a Pressure Water Regulator begins to fail, you may notice sharp pressure swings, hammering pipes, or gradual psi changes. Other warning signs include visible corrosion, fitting leaks, and a Water Pressure Regulator that will not hold a steady setting. These symptoms often point to worn internal parts or debris-clogged screens.
Simple checks can often resolve issues before professional help is needed. Attach a gauge to an outside hose bib or water heater outlet to verify downstream pressure. Check that the main shutoff and all relevant zone valves are completely open. For irrigation, verify that each zone meets the minimum flow needed for the Pressure Regulator Valve to regulate correctly.
If your regulator has an integrated strainer, shut off supply pressure and clean or replace the screen to remove grit and sediment. After reassembly, test the unit again and compare gauge readings. Low flow through a House Water Pressure Regulator can cause pressure to climb when fixtures close. Consider whether a Water Pressure Reducing Valve or limit valve is better for multi-zone irrigation.
If adjustment makes no difference, or the regulator cannot maintain the chosen set point, replacement is usually the practical answer. Ongoing humming, pipe hammer, or sharp pressure spikes often point to a damaged diaphragm, weakened spring, or internal failure. Regulator age is another clue, because units older than 10–15 years may need replacement even without visible leaks.
Before servicing a Pressure Water Regulator, safety begins by relieving system pressure. Local codes often require a PRV when inlet pressure surpasses approved limits. The International Plumbing Code is commonly referenced for keeping household pressure below about 80 psi. For complex problems, disassembly-based adjustments, or code compliance concerns, hire a licensed plumber for diagnosis and safe replacement of a Pressure Regulator Valve or House Water Pressure Regulator.
Conclusion
When properly installed, a Pressure Water Regulator can keep home water pressure near the recommended 40–60 psi range. That stable pressure protects pipes, fixtures, and appliances while reducing waste. Regular gauge checks and small seasonal adjustments are important. Leak inspections also help maintain regulator performance and extend service life.
In drip and irrigation systems, select a regulator that matches both flow demand and outlet pressure requirements. Place it after the filter and timers when practical. In multi-zone setups, a pressure limit valve before control valves helps maintain steady operation. Make sure the device meets minimum flow requirements to avoid erratic pressure.
Many Whole House Pressure Regulator units are intended for set-and-forget use and commonly last around 10–15 years. Even so, monthly monitoring and yearly inspections are wise. A Water Pressure Regulator should be replaced when it will not adjust, cannot hold pressure, or shows clear damage. For code concerns, recurring symptoms, or uncertain diagnosis, consult a licensed plumber.
Using quality parts and compatible replacements from trusted suppliers improves reliability and maintenance ease. With the right regulator, correct sizing, and basic upkeep, home and garden plumbing can operate more efficiently and last longer.